

Perfect sauté techniques with carbon steel pans: 9/10 sear
Soggy vegetables. Unevenly browned chicken. A steak that steams instead of sears. If any of these sound familiar, the problem is almost certainly your pan, not your skill. Most home cooks reach for nonstick or stainless steel by habit, not by choice, and then wonder why their sauté results fall flat. Carbon steel pans change that entirely. Lighter than cast iron, more responsive than stainless, and capable of building a natural nonstick surface over time, they are the tool professional kitchens have relied on for generations. This guide walks you through every step, from choosing the right pan to mastering advanced techniques like butter basting.
Table of Contents
- Essential tools and setup for sautéing with carbon steel
- Step-by-step sauté technique for carbon steel perfection
- Advanced sauté: Butter basting and flipping for expert results
- Troubleshooting and achieving consistent sauté results
- Rethinking sauté: What most cooks get wrong with carbon steel
- Discover premium carbon steel pans for your kitchen
- Frequently asked questions
Key Takeaways
| Point | Details |
|---|---|
| Pan selection matters | A well-designed carbon steel pan enables crisp, even sauté results and easy tossing. |
| Preheat is crucial | Achieving the right pan temperature ensures even cooking and prevents food sticking. |
| Oil and timing | Always use high smoke-point oils and precise timing to form an ideal crust. |
| Advanced techniques | Butter basting and frequent flipping elevate flavour and texture during sautéing. |
| Troubleshoot effectively | Understand common mistakes to consistently deliver professional-quality sauté outcomes. |
Essential tools and setup for sautéing with carbon steel
Now that you know why carbon steel pans are the professional’s choice, let us review what you need to get started.
A carbon steel pan is made from an alloy of iron and a small percentage of carbon, typically between 0.5% and 1.5%. This composition gives it exceptional heat responsiveness: it heats up quickly, cools down quickly, and holds a high temperature well once it is up to speed. Unlike cast iron, which is thick and slow to respond, carbon steel reacts almost instantly to changes in flame or induction power. That makes it ideal for sautéing, where you need precise control.
Pan geometry matters more than most cooks realise. A wide, flat base with gently sloped sides allows moisture to escape as steam rather than pool around your food. Pooling moisture is the enemy of a good sauté: it drops the pan temperature and causes food to stew rather than brown. The good sauté pan features you should look for include a base diameter of at least 24 cm for most tasks and sides that allow easy tossing.
Thickness and weight also affect technique. The best carbon steel pans score 9/10 for searing crust and excel at sauté tossing precisely because they stay under 3 lbs (roughly 1.4 kg), making them easy to lift and manoeuvre. Our 27 cm pan at 2 kg sits right in that sweet spot for everyday cooking, while the 30 cm, 3 kg option suits larger family meals.
Here is how carbon steel compares to its closest rivals:
| Feature | Carbon steel | Cast iron | Stainless steel |
|---|---|---|---|
| Weight | Light to medium | Heavy | Light to medium |
| Heat-up speed | Fast | Slow | Fast |
| Heat retention | Very good | Excellent | Moderate |
| Natural nonstick | Yes (seasoned) | Yes (seasoned) | No |
| Reactivity with acid | Moderate | Moderate | None |
| Oven safe | Yes | Yes | Yes |
To understand how carbon steel is made and why single-piece forging matters for durability, it is worth reading up before you buy. Riveted handles trap grease and eventually loosen; a seamless pan is simply easier to maintain.
For utensils, use wooden or silicone spatulas to protect your seasoning layer. A pair of tongs is useful for proteins. Keep a folded kitchen towel nearby for safe handle gripping, especially after oven use.
Pro Tip: If you plan to toss vegetables or flip food by shaking the pan, the 27 cm option is your best choice. The lighter weight reduces wrist fatigue during longer cooking sessions considerably.
For a full walkthrough of the saute pan workflow, from first heat to plating, bookmark that guide alongside this one.
Step-by-step sauté technique for carbon steel perfection
With your tools ready and pan chosen, it is time to master the actual sauté process.
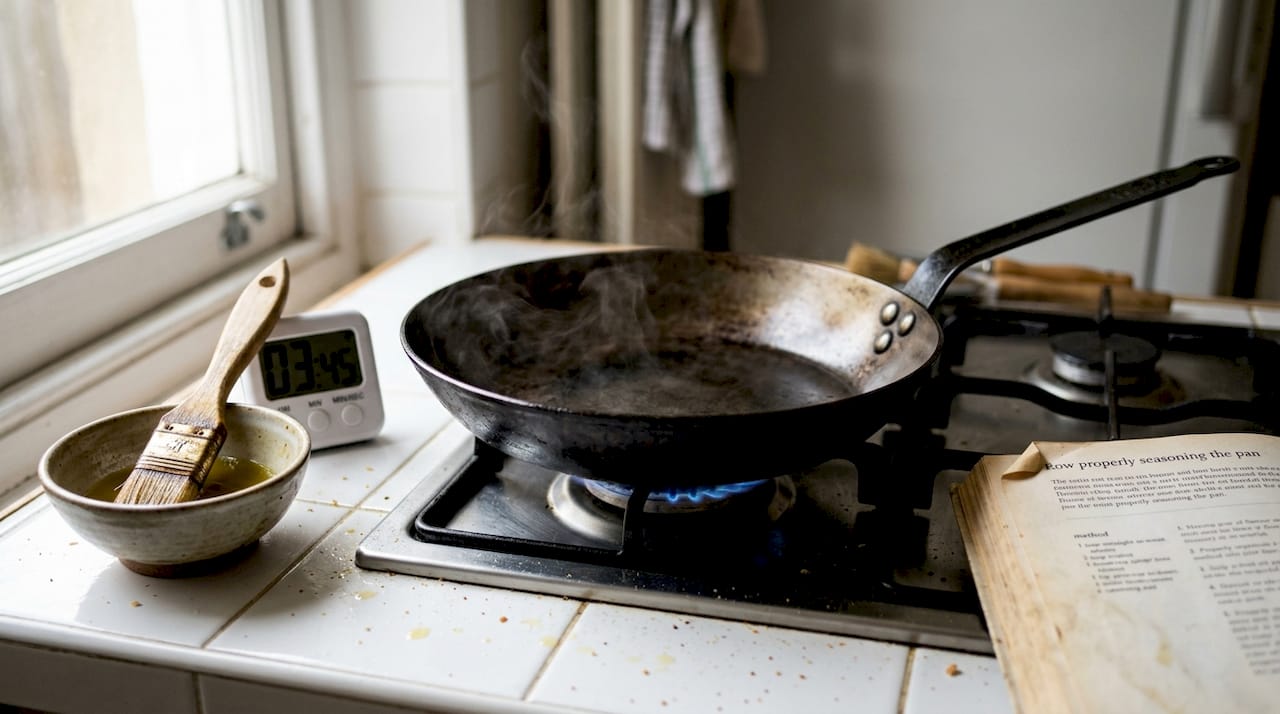
The single most important step is the preheat. Place your carbon steel pan on medium-high heat with nothing in it. Wait. This takes longer than most people expect, usually two to three minutes on a gas hob or slightly longer on induction. You will know the pan is ready when a few drops of water flicked onto the surface bead up and skitter across without evaporating instantly. That is the Leidenfrost effect in action: a sign the surface is uniformly hot.
Once hot, add a thin layer of high smoke-point oil. Grapeseed and avocado oil are excellent choices. Swirl to coat the base, then let it shimmer for about 20 seconds. As outlined in our perfect sear technique guide, you should add food in a single layer without overcrowding to avoid steaming.
Here is the step-by-step sequence:
- Pat food completely dry with kitchen paper before it goes anywhere near the pan.
- Season generously with salt and pepper. For proteins, salt at least 30 minutes ahead for a dry-brine effect.
- Preheat the pan dry on medium-high until the water droplet test passes.
- Add a thin layer of high smoke-point oil and let it shimmer.
- Place food in a single layer, leaving space between each piece.
- Do not touch it. Let the crust develop undisturbed.
- Check for natural release: properly seared food lifts cleanly from the pan when the crust is ready.
- Flip and repeat on the second side.
Here is a quick reference for timing by protein:
| Protein | Thickness | First side | Second side | Target internal temp |
|---|---|---|---|---|
| Steak (medium rare) | 2.5 cm | 2 to 3 min | 2 to 3 min | 55°C |
| Chicken breast | 2 cm | 4 to 5 min | 3 to 4 min | 74°C |
| Salmon fillet | 2 cm | 3 to 4 min | 1 to 2 min | 60°C |
| Vegetables | Varied | 2 to 3 min | 1 to 2 min | Tender and golden |
For more ideas on uses for a sauté pan beyond proteins, the range of dishes you can tackle is broader than most cooks expect.
Pro Tip: Never sauté straight from the fridge. Cold food drops the pan temperature sharply, which leads to steaming rather than searing. Let proteins rest at room temperature for 20 to 30 minutes before cooking.
Advanced sauté: Butter basting and flipping for expert results
Once you have nailed the basics, you can enhance your sauté results with a few professional techniques.
Butter basting is the move that separates a good home cook from a great one. After your initial sear on medium-high heat, reduce to medium and add a generous knob of unsalted butter to the pan. As it melts and begins to foam, add aromatics: a sprig of thyme, a crushed garlic clove, or a halved shallot. Now tilt the pan slightly away from you and use a large spoon to scoop the foaming butter continuously over the food.
This technique works for two reasons. First, butter conducts heat to the top surface of the food without requiring you to flip it, cooking the protein more evenly. Second, the aromatics infuse the butter rapidly, and that flavoured fat penetrates the crust with every spoonful. According to testing on butter-basted technique, flipping frequently reduces overall cook time and produces a more even crust than a single long sear on each side.
Here is the basting sequence:
- Complete the initial sear on the first side until the crust releases naturally.
- Flip the food and reduce heat to medium.
- Add butter and aromatics immediately.
- Tilt the pan and baste continuously for 60 to 90 seconds.
- Flip again and baste the other side briefly.
- Remove from heat and rest before slicing.
“Pat food dry, season generously, sear undisturbed until the crust forms and releases naturally, then flip frequently for an even crust.” This is the professional rhythm: patience first, then movement.
Frequent flipping is counterintuitive for many home cooks who have been told to leave food alone. The science is clear: flipping every 30 to 60 seconds during the later stages of cooking keeps the surface temperature more consistent and prevents one side from overcooking while the other catches up.
For a deeper look at how carbon steel compares to cast iron for this kind of technique, the cast iron saute analysis is worth reading alongside this guide.
Pro Tip: Tilt the pan at a 20 to 30 degree angle when basting. This pools the butter at the lower edge, making it easier to scoop and reducing the risk of splashing.
Troubleshooting and achieving consistent sauté results
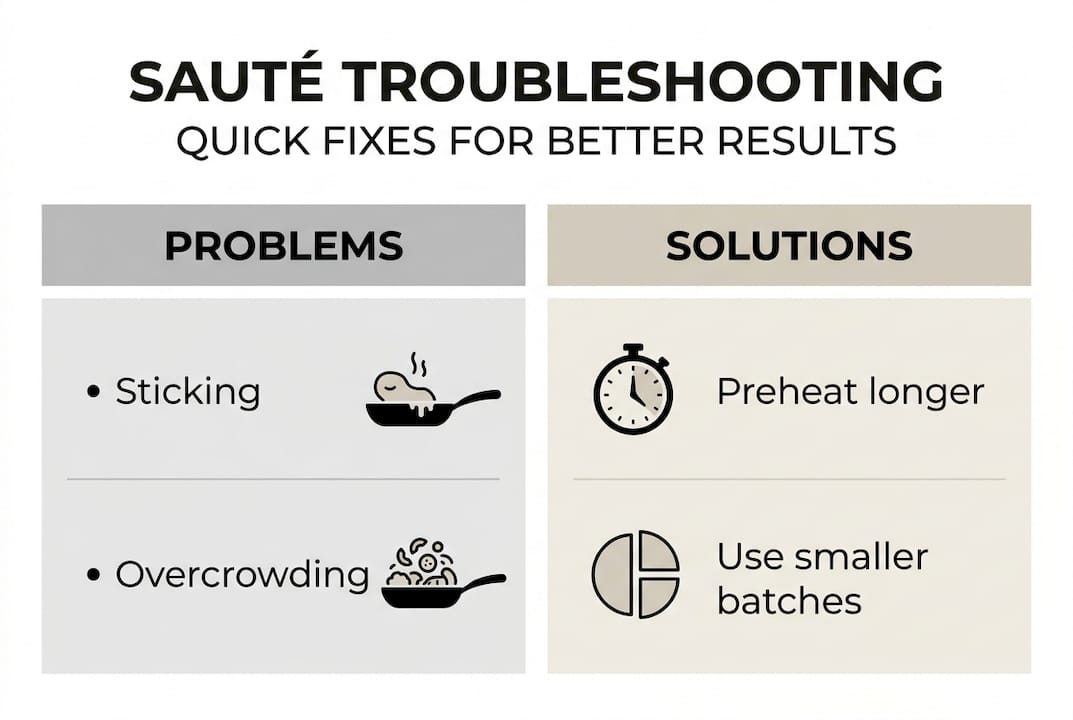
To consistently achieve crisp, golden sauté results, it helps to spot common pitfalls and know how to tackle them.
The most frequent mistake is overcrowding. When you add too much food at once, the pan temperature drops sharply and the moisture released by the food cannot evaporate fast enough. The result is steaming, not sautéing. Work in batches if you are cooking for a crowd, even if it feels slower. It is always faster than trying to rescue soggy food.
Sticking is the second most common complaint. Food sticks for one of three reasons: the pan was not hot enough before the oil went in, the seasoning layer is thin or damaged, or the food was moved too soon. Carbon steel, like cast iron, needs patience. If the food resists when you try to lift it, leave it for another 30 seconds. A proper crust releases on its own.
Here is how carbon steel compares to stainless steel for troubleshooting purposes:
| Issue | Carbon steel | Stainless steel |
|---|---|---|
| Sticking | Season regularly to prevent | Use more oil, preheat carefully |
| Poor crust | Rare when preheated correctly | Common if pan is cold |
| Heat drop on food addition | 18 to 40% less than stainless | Significant drop |
| Acidic foods | Can cause discolouration | Fully non-reactive |
| Cleaning | Warm water, no soaking | Dishwasher safe |
For a thorough breakdown of carbon steel vs stainless steel and which suits your cooking style, that comparison covers everything from reactivity to long-term maintenance. If you are still deciding which material fits your kitchen, the choose pan material guide is a practical starting point.
For ongoing maintenance, follow these habits:
- Clean with warm water immediately after cooking, while the pan is still warm.
- Dry thoroughly on the hob over low heat for one to two minutes.
- Apply a very thin layer of oil with a paper towel before storing.
- Cook fatty foods like bacon or sausages regularly to strengthen the seasoning.
- Re-season in the oven if the surface looks dull or food starts to stick persistently.
Pro Tip: Season your pan every few weeks even if it looks fine. A well-maintained seasoning layer is your best insurance against sticking and rust, and it gets better with every use.
Rethinking sauté: What most cooks get wrong with carbon steel
Most home cooks approach carbon steel the same way they approach stainless steel: add oil early, cook on moderate heat, and deglaze with wine or stock at the end. That works perfectly well for stainless, but it misses what makes carbon steel exceptional.
Carbon steel needs a dry preheat. Adding oil to a cold or lukewarm pan before the metal is properly hot is the single most common error. The pan needs to reach temperature first, then the oil goes in, then the food. This sequence is non-negotiable for a proper sauté.
Seasoning is not just maintenance; it is performance. A well-seasoned pan releases food more cleanly than most nonstick surfaces after a year of regular use. The polymerised seasoning layer forms at temperatures above 220°C (420°F), which is exactly the range you are cooking at during a proper sauté.
As for acidic pan sauces, stainless steel is preferable for tomato or wine-heavy reductions because carbon steel can discolour and the seasoning degrades with prolonged acid contact. Use your carbon steel for the sear and finish the sauce in a separate pan if needed. This is not a weakness; it is simply knowing your tools. For a direct comparison of carbon steel vs stainless tips, that guide covers the nuances in detail.
Trust the pan, not the clock. If the crust has not released, it is not ready. That is the most important lesson carbon steel teaches you.
Discover premium carbon steel pans for your kitchen
If you are ready to put these techniques into practice, the right pan makes all the difference. At Brass & Steel, we forge our carbon steel sauté pans from a single piece of steel, with no rivets, no welds, and no coatings. The 27 cm pan at €99 suits everyday sautéing, while the 30 cm option at €119 handles larger meals with ease. Both are induction compatible and free from PTFE and PFOA.
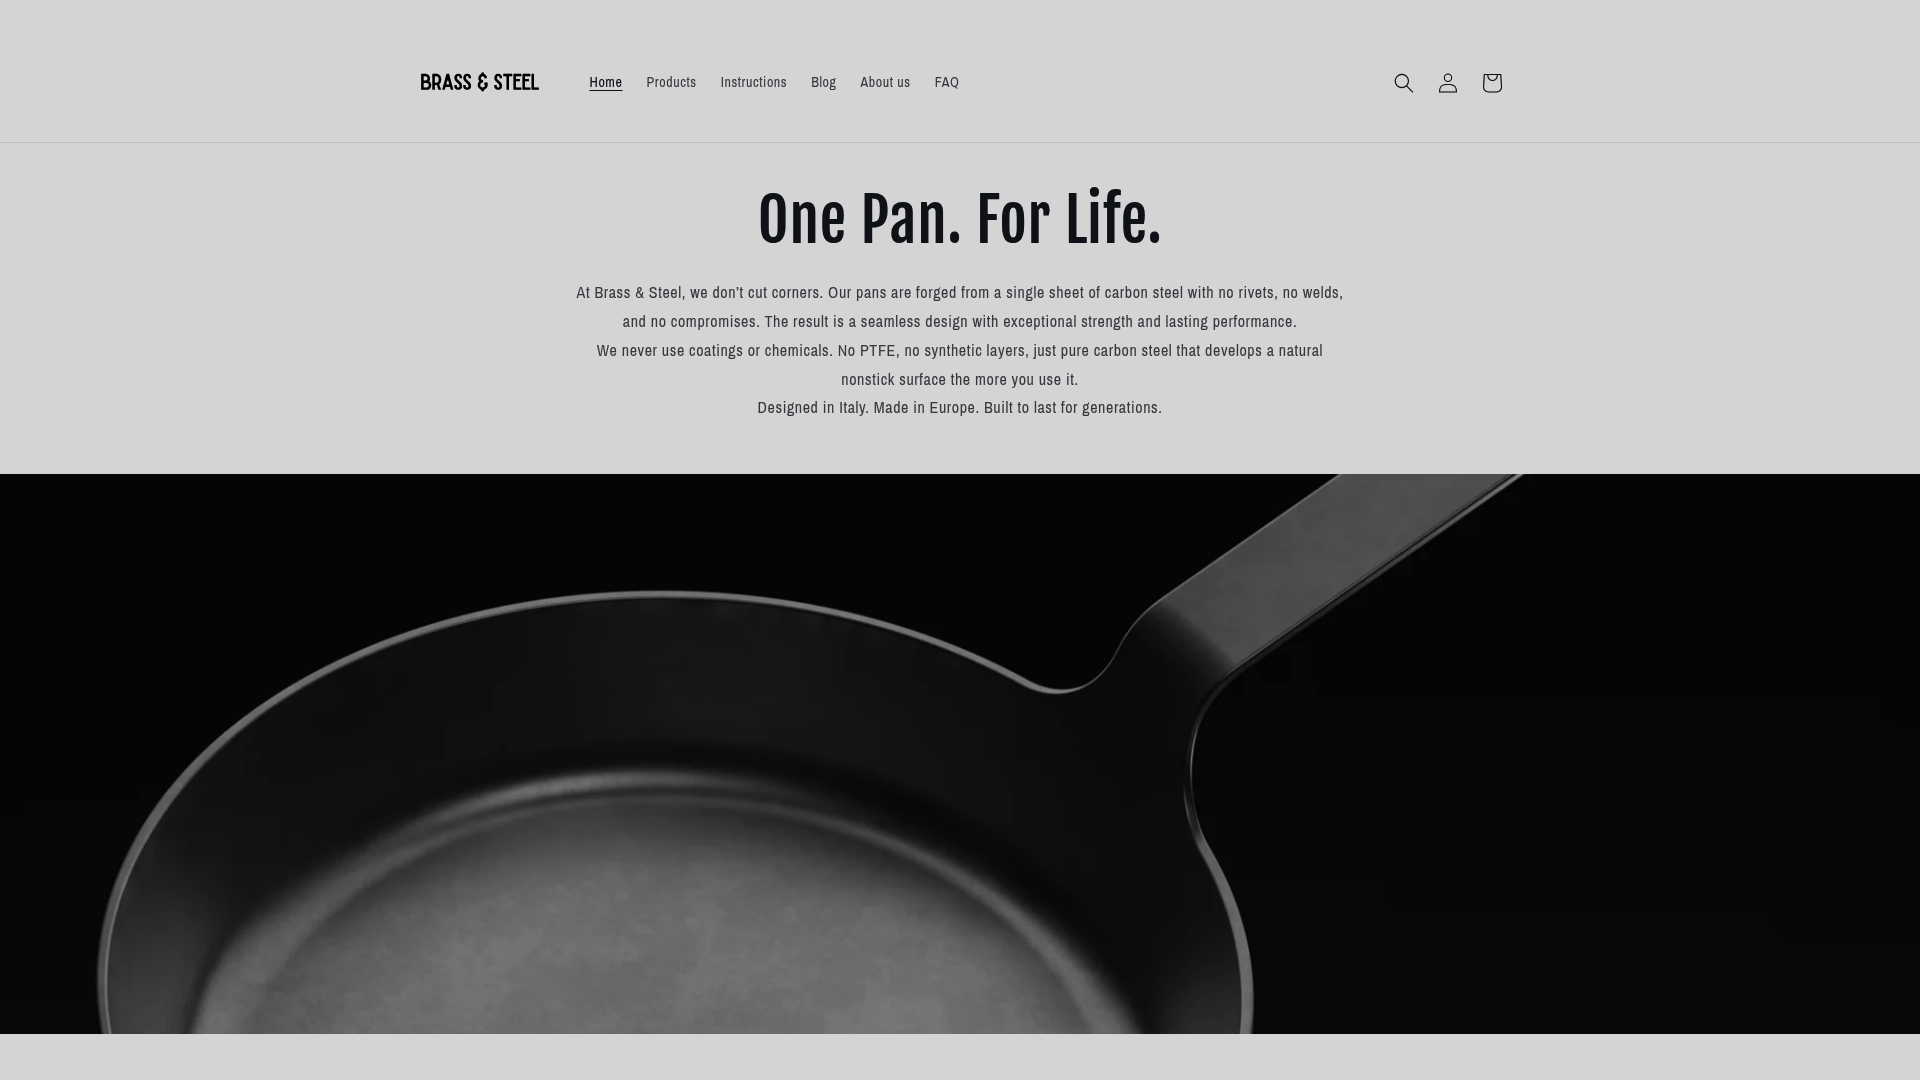
For those who want to understand the craft behind their cookware, our guide on making carbon steel pans explains the forging process and why construction quality directly affects cooking performance. Investing in the right tool now means years of consistently excellent results.
Frequently asked questions
What makes carbon steel pans ideal for sautéing?
Carbon steel pans heat rapidly, retain heat well, and are lightweight enough for easy tossing. Independent testing confirms they score 9/10 for searing crust and excel at sauté tasks due to their manageable weight.
Why is it important to preheat a carbon steel pan before sautéing?
Preheating ensures the surface is uniformly hot before oil or food is added, which prevents sticking and creates the conditions needed for a proper crust. A dry preheat on medium-high until the water droplet test passes is the reliable method.
Should I season my carbon steel pan before sautéing?
Yes. Seasoning creates a polymerised nonstick layer that improves food release and becomes more effective with every use. A well-seasoned pan performs better than a new one.
Can I sauté acidic foods like tomatoes in carbon steel?
It is best to avoid prolonged cooking of acidic ingredients in carbon steel. As stainless steel handles acid better for pan sauces, use carbon steel for the initial sear and switch pans if a long acidic reduction follows.