

How to Remove Rust from Carbon Steel Pan Effectively
Rust can turn even a cherished French skillet or German wok into a source of frustration overnight. For anyone in Europe who values the tradition and performance of carbon steel cookware, knowing how to assess and restore a pan is more than just practical—it is the key to preserving a trusted kitchen companion. Learn how to identify rust level, clean effectively, and master ongoing maintenance for a pan that stands the test of time.
Table of Contents
- Step 1: Assess And Prepare The Rusted Carbon Steel Pan
- Step 2: Remove Rust Safely Using Recommended Methods
- Step 3: Clean And Dry The Pan Thoroughly
- Step 4: Re-Season To Restore Natural Nonstick Surface
- Step 5: Protect The Pan With Ongoing Maintenance
Quick Summary
| Key Takeaway | Explanation |
|---|---|
| 1. Assess rust before cleaning | Determine rust level to choose the best removal method and avoid damaging the pan. |
| 2. Use appropriate cleaning methods | Select a method like salt and oil, steel wool, or vinegar based on rust severity. |
| 3. Thoroughly dry post-cleaning | Ensure complete drying with heat to prevent rust recurrence, even in crevices. |
| 4. Re-season for nonstick surface | Apply a thin layer of high smoke point oil and heat to create a durable nonstick layer. |
| 5. Maintain with regular care | Wash, dry, and oil your pan regularly to prevent rust and enhance seasoning over time. |
Step 1: Assess and Prepare the Rusted Carbon Steel Pan
Before you grab any tools or cleaning supplies, take a moment to examine your pan closely. Understanding the extent of the rust damage will determine which removal method works best and how much elbow grease you’ll actually need.
Rust on carbon steel comes in different forms, and each requires a slightly different approach. You’ll want to categorise what you’re looking at as light, superficial rust or heavier, more entrenched rust that’s eaten deeper into the metal surface. Light rust appears as brown or orange discolouration on the surface, whilst heavy rust shows dark pitting or flaking that compromises the pan’s structure.
Here’s how to assess your specific situation:
- Light rust: Surface discolouration you can see, but the pan feels smooth underneath. This is the easiest to tackle.
- Medium rust: Some pitting visible, flaking patches that come off when you rub them. Still manageable with standard methods.
- Heavy rust: Deep pitting, thick crusty buildup, or rust that’s spread across large areas. This requires more aggressive techniques.
Once you’ve identified the rust level, it’s time to prepare the pan for cleaning. Start by removing any loose rust and debris with a dry brush or cloth. Run your fingers over the surface to feel for flaking or loose bits that will come away easily.
If there’s heavy buildup, use a soft brass brush or a non-abrasive scrubbing pad to loosen debris without scratching the underlying steel. Work gently in circular motions rather than aggressive scrubbing, which can cause unnecessary damage to the seasoning layer beneath the rust.
Rinse the pan under warm water to remove loose particles and dry it completely with a clean towel. Your pan is now assessed and ready for the actual rust removal process.
Know your rust level before choosing a removal method. Light surface rust responds to gentle scrubbing, whilst stubborn pitting may need stronger intervention.
Pro tip: Inspect your pan in natural light or near a window to accurately judge rust depth and coverage, as shadows can make rust appear worse or better than it actually is.
Step 2: Remove Rust Safely Using Recommended Methods
Now that you’ve assessed your pan and identified the rust level, it’s time to choose the right removal technique. The method you select depends on how deeply the rust has penetrated, and the goal is always to remove rust without unnecessarily damaging the steel underneath.
You have several effective options to work with, each suited to different rust severity levels. Common rust removal methods include manual scrubbing with coarse salt and oil, steel wool for heavier rust, and chemical treatments with vinegar to dissolve rust particles. These approaches balance effective rust removal whilst preserving your pan’s integrity and seasoning potential.
Here are your primary methods:
- Salt and oil scrub: Mix coarse salt with a neutral oil like grapeseed or sunflower oil to create an abrasive paste. Rub this onto the rusted areas using circular motions with a cloth or soft brush. This works brilliantly for light to medium rust and is the gentlest option available.
- Steel wool or brass brush: Use fine-grade steel wool or a soft brass brush for stubborn rust spots. Work gently to avoid gouging the metal, and always scrub in circular patterns rather than back and forth.
- Vinegar soak: For heavier rust, soak the affected area in white vinegar for 30 minutes to a few hours. The acidity dissolves rust particles, making removal easier. Wipe away loosened rust with a cloth and repeat if necessary.
Start with whichever method matches your rust level, then test a small area first. Work methodically across the entire pan, checking your progress as you go. Once you’ve removed the visible rust, rinse the pan thoroughly under warm water and dry it completely with a clean towel.
Here’s a quick comparison of rust removal techniques and their impact on pan preservation:
| Method | Rust Severity Addressed | Effect on Seasoning Layer | Best for |
|---|---|---|---|
| Salt & oil scrub | Light to medium | Most gentle, minimal disruption | Regular maintenance |
| Steel wool | Medium to heavy | Moderate, can thin seasoning | Tough spots, restoring |
| Vinegar soak | Heavy, entrenched | Can strip seasoning significantly | Severely rusted pans |
Always test your chosen method on a small rusted area first to ensure it doesn’t damage the underlying seasoning layer.
Pro tip: Combine methods for best results: use salt and oil first for surface rust, then switch to vinegar for stubborn spots that remain, creating a two-stage approach that maximises effectiveness whilst minimising damage.
Step 3: Clean and Dry the Pan Thoroughly
With the rust removed, your pan needs a proper clean to eliminate any remaining debris or rust particles. This step is crucial because leftover moisture or rust fragments can trigger new rust formation within hours, undoing all your hard work.
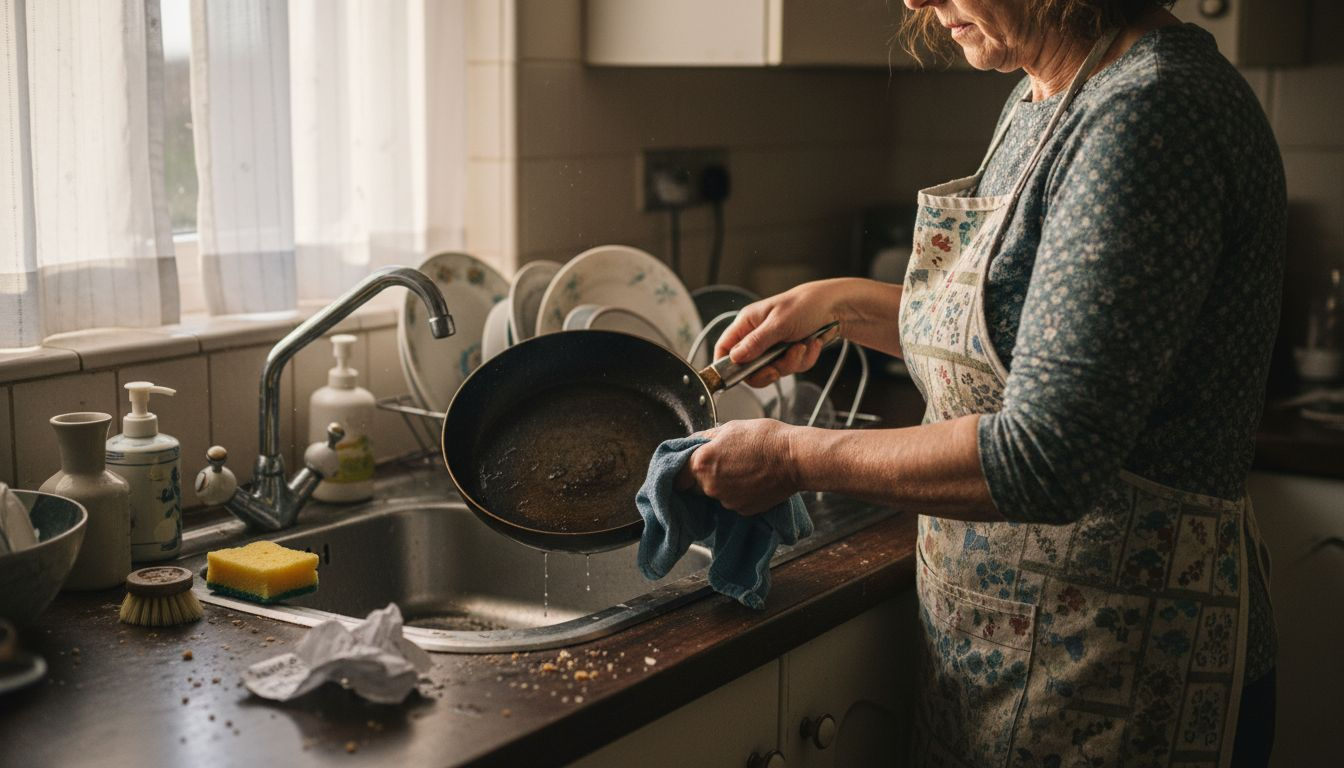
Start by rinsing the pan under hot running water with a soft brush or cloth. Work gently over all surfaces, paying special attention to any grooves or textured areas where rust particles hide. Use a gentle brush rather than an abrasive one at this stage, as the pan is now more vulnerable after rust removal.
Once you’ve rinsed thoroughly, move on to the drying phase, which is where most people slip up. Thorough drying is critical to prevent new rust formation, and simply wiping with a towel often leaves moisture trapped in microscopic crevices. Here’s the better approach:
- Dry the pan completely with a clean towel, pressing gently to absorb surface moisture.
- Place the pan on your stovetop over low heat for 2 to 3 minutes. This gentle warmth ensures all remaining moisture evaporates fully.
- Remove from heat and let it cool for a moment until it’s comfortable to touch.
Once the pan is completely dry and cool, you’re ready to protect it. Apply a very light coat of neutral oil like grapeseed or sunflower oil using a clean cloth. Buff away any excess so the pan looks almost dry rather than shiny, as too much oil creates a sticky surface.
Never store a carbon steel pan whilst any moisture remains, as rust can develop rapidly in damp conditions.
Pro tip: Keep a dedicated cloth just for drying your pans to avoid transferring moisture from other kitchen tasks, and always complete the drying and oiling process immediately after cleaning before the pan has time to cool completely.
Step 4: Re-season to Restore Natural Nonstick Surface
Now comes the part that transforms your restored pan back into a reliable cooking tool. Re-seasoning builds that protective, naturally nonstick layer that makes carbon steel pans so brilliant for cooking. This process polymerises oil onto the metal surface, creating a hard coating that improves with every use.
Start with your clean, dry pan and apply a very thin layer of high smoke point oil. Use oils like grapeseed, avocado, sunflower, or canola oil. Avoid olive oil or animal fats, as these have lower smoke points and don’t polymerise effectively.
For reference, here’s a summary of seasoning oils and their properties:
| Oil Type | Smoke Point | Seasoning Effect | Recommended Use |
|---|---|---|---|
| Grapeseed | High (about 220°C) | Polymerises well, even coating | Ideal for all seasoning steps |
| Sunflower | High (about 225°C) | Durable, light finish | Suitable for routine use |
| Avocado | Very high (about 270°C) | Strong, resilient layer | Excellent for initial seasoning |
| Canola | High (about 205°C) | Smooth, easy to apply | Good for regular maintenance |
Apply the oil sparingly using a clean cloth, then buff away excess so the pan looks almost dry rather than shiny. Too much oil creates a sticky, gummy surface you do not want. The goal is a nearly invisible layer that covers the entire cooking surface.
Polymerising the oil through heating creates the durable protective coating. Here’s the process:
- Place the oiled pan on your stovetop over medium-high heat. Watch carefully until it just begins to smoke lightly.
- Remove from heat immediately and let it cool completely. The smoking indicates the oil has polymerised and bonded to the steel.
- Once cool, wipe away any excess residue with a clean cloth.
- Repeat this process 2 to 3 times for a stronger base seasoning.
Each time you cook with fatty foods afterwards, you’re adding more layers of seasoning. This natural build-up is what creates that prized nonstick surface that improves over years of use.
The more you cook with your carbon steel pan, the better the seasoning becomes. Patience and regular cooking are your best tools.
Pro tip: Season your pan in the evening when you have time to let it cool naturally, and always work in a well-ventilated space since the smoking oil creates visible steam and smoke that can set off smoke detectors.
Step 5: Protect the Pan with Ongoing Maintenance
You’ve removed the rust, cleaned thoroughly, and restored your seasoning. Now the real work begins, and it’s much easier than you might think. Consistent, simple maintenance is what keeps your carbon steel pan rust-free and performing brilliantly for decades.
The key to protection is understanding that your pan needs three basic things after every use. First, wash it promptly with warm water and a soft cloth or brush. Avoid soaking, as standing water invites rust. Second, dry it completely and immediately, either with a towel or briefly on the stovetop over low heat. Third, apply a light coat of oil whilst the pan is still slightly warm.
These three steps, done faithfully after each use, create a virtuous cycle that keeps rust at bay. The oil layer protects the metal, and the seasoning builds up gradually with every cook.
Beyond daily care, preventing rust through proper maintenance involves understanding your environment. Here’s what matters most:
- Storage location: Keep your pan in a dry place. Humid kitchens or damp cupboards are rust’s best friend. If you live somewhere particularly humid, consider storing your pan with a small pouch of silica gel nearby.
- Cooking habits: Cook with fats and oils regularly. Every time you use butter, oil, or fatty meats, you’re adding seasoning layers. This natural build-up is your best defence against rust.
- Avoid prolonged moisture: Never leave water sitting on the pan, even for a few minutes. Wipe it away immediately and dry thoroughly.
- Inspect regularly: Give your pan a quick visual check monthly. Catching tiny rust spots early is far easier than dealing with heavy rust later.
Think of maintenance as a conversation with your pan. The more attention you give it now, the less trouble you’ll have later.
A few seconds of daily care prevents hours of remedial work. Make it habit, and you’ll never need another rust-removal session.
Pro tip: Keep a dedicated cloth or small brush near your cooker for immediate post-cooking cleaning, making the three-step maintenance routine so quick and easy that you’ll do it automatically without thinking.
Restore Your Kitchen with Durable, Rust-Resistant Carbon Steel Cookware
If you have wrestled with rust on your carbon steel pan and long for a lasting solution, Brass & Steel offers craftsmanship designed to eliminate such worries. Our Carbon Steel Collection | Brass&Steel features pans forged from a single piece of premium carbon steel for unrivalled strength and a natural nonstick surface that builds resilience with each seasoning. No more fragile rivets or rust-prone joints.
Explore how owning a pan engineered for durability and easy maintenance can free you from frequent rust removal routines. Discover heirloom-quality cookware made in Poland with Italian design precision by visiting Brass & Steel today. Ready to upgrade your cooking experience while enjoying effortless care? Browse our New Arrivals – Brass & Steel and find your perfect pan now.
Frequently Asked Questions
How can I assess the rust level on my carbon steel pan?
To assess the rust level on your carbon steel pan, inspect it closely for signs of discolouration or pitting. Light rust will appear as brown or orange on the surface, while heavy rust shows deep pits or flaking. Use this assessment to choose the appropriate rust removal method.
What is the best method to remove light rust from a carbon steel pan?
For light rust, a salt and oil scrub is highly effective. Mix coarse salt with a neutral oil to create an abrasive paste, then gently rub it onto the rusted areas in circular motions until the rust is removed.
How do I remove heavy rust from my carbon steel pan?
For heavy rust, soaking the affected area in white vinegar for 30 minutes to a few hours can effectively dissolve rust particles. Afterward, wipe away the loosened rust with a cloth and repeat the process if necessary until the rust is gone.
What should I do after removing rust from my carbon steel pan?
Once you’ve removed the rust, clean the pan thoroughly to eliminate any remaining particles and moisture. Rinse it under hot water, dry it completely with a towel, and then place it on low heat for a few minutes to ensure all moisture evaporates.
How can I maintain my carbon steel pan to prevent future rust?
To prevent future rust, consistently clean your pan after each use and dry it thoroughly. Apply a light coat of oil when it is still warm to protect the surface, and store it in a dry place. By following these steps, you can significantly reduce the chance of rust formation over time.
How often should I re-season my carbon steel pan?
Re-season your carbon steel pan every few months or whenever you notice that food starts to stick. Apply a thin layer of high smoke point oil and heat it until it begins to smoke, repeating the process 2 to 3 times for the best results in maintaining its natural nonstick surface.
Recommended
- How to Prevent Rust on a Carbon Steel Pan Easily – Brass & Steel
- Complete Guide to Rust Prevention for Pans – Brass & Steel
- How to Deep Clean Carbon Steel Pan for Lasting Performance – Brass & Steel
- How to Clean a Carbon Steel Pan Naturally Step-by-Step – Brass & Steel
- How to Prevent Car Rust Naturally and Keep Your Ride Pristine | ReVroom
- How to Clean a Marble Tile Shower Step by Step– SurfacesGalore