

How to re-season a non-stick pan: a simple guide
TL;DR:
- Re-seasoning a non-stick pan involves cleaning and applying a thin oil layer to restore its slick surface, but it cannot fix badly damaged or peeling coatings. Proper care, including gentle washing, using high-smoke-point oils, and low to medium heat, extends the pan’s lifespan and maintains optimal performance. Regular habits like avoiding metal utensils and high heat prevent coating degradation, reducing the need for frequent re-seasoning.
Re-seasoning a non-stick pan means cleaning the surface thoroughly and applying a thin layer of oil to restore its smooth, slick finish. This is not the same as seasoning cast iron, and treating it like cast iron is one of the most common mistakes home cooks make. Most non-stick pans use a PTFE coating, and the process to revive non-stick finish is gentler than you might expect. Done correctly, it extends the life of your pan and brings back reliable cooking performance without spending money on a replacement.
How to re-season a non-stick pan: signs it’s time to start
Your pan is telling you it needs attention when eggs start sticking, food tears instead of sliding, or the surface looks dull and patchy. These are signs of coating degradation or built-up residue, not necessarily permanent damage. Re-conditioning the surface at this stage can restore slickness and protect what remains of the coating.
It is worth knowing the difference between a pan that needs re-seasoning and one that needs replacing. If you see visible peeling or flaking, the coating is compromised and no amount of oil conditioning will fix it. Flaking coating can be unsafe, and replacement is the right call at that point.
Re-seasoning works best when:
- Food is sticking despite using oil or butter
- The surface looks dull or feels rough to the touch
- There is a sticky residue that normal washing does not remove
- Performance has gradually declined over several months of use
Pro Tip: Re-seasoning is a conditioning step, not a repair. It refreshes a surface that is still structurally sound. If the coating is scratched deeply or peeling, no oil treatment will restore it.
The realistic benefit of re-seasoning is improved day-to-day performance and a modest extension of your pan’s useful life. It does not permanently fix a damaged coating, but it does make a noticeable difference on a pan that is simply tired from regular use.
What you need before you start
Getting the right materials together before you begin saves time and protects your pan from accidental damage during the process.
Safe materials to use:
- Mild dish soap (not heavy-duty degreasers)
- Soft sponge or microfibre cloth
- Neutral, high-smoke-point oil: vegetable, canola, avocado, or coconut oil
- Paper towels or a clean dry cloth
What to avoid entirely:
- Steel wool or abrasive scrubbing pads
- Aerosol cooking sprays
- Metal utensils or scourers
- Dishwasher detergent
The table below summarises what is safe and what is not when caring for your pan:
| Material or tool | Safe to use? |
|---|---|
| Soft sponge and mild soap | Yes, always |
| Baking soda paste (for residue) | Yes, used gently |
| Avocado or canola oil | Yes, ideal choice |
| Aerosol cooking spray | No, leaves residue |
| Steel wool or metal scrubbers | No, scratches coating |
| Dishwasher | No, degrades coating over time |
Cooking sprays leave residue that builds up on the surface and reduces non-stick effectiveness over time. That residue is also notoriously difficult to remove without scrubbing, which then causes further damage. Stick to oil poured from a bottle or a small knob of butter instead.
Pro Tip: Choose an oil with a smoke point above 200°C, such as avocado oil or refined canola oil. Oils that burn at low temperatures leave a sticky, gummy film rather than a clean polymerised layer.
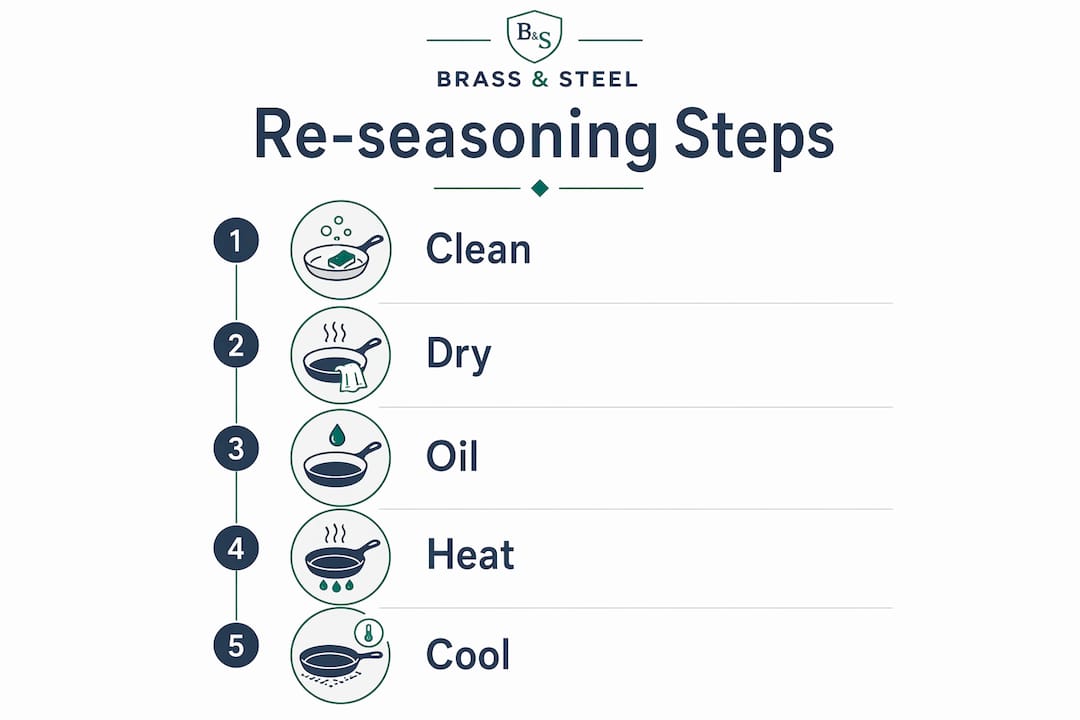
Step-by-step guide to re-seasoning your non-stick pan
This process takes about 15 minutes and requires no special equipment. Follow each step carefully and you will notice the difference the next time you cook.
-
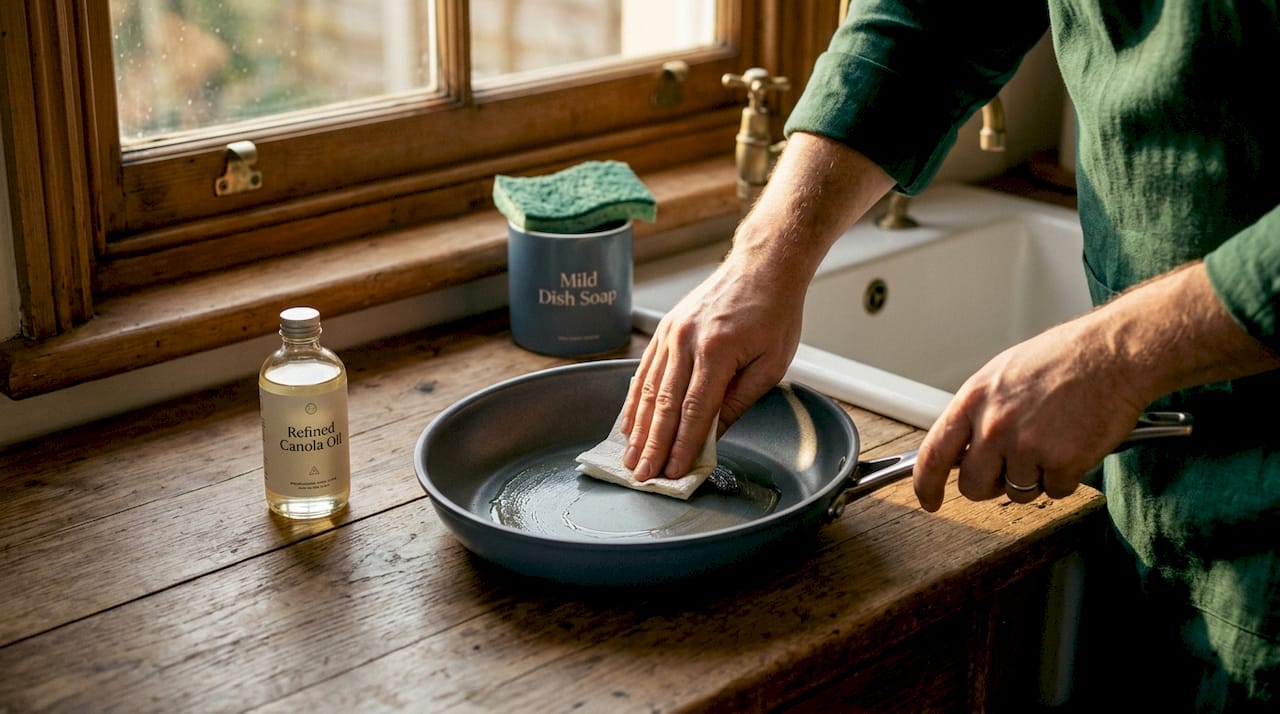
Wash the pan by hand. Use warm water, a small amount of mild dish soap, and a soft sponge. Scrub gently to remove any grease, residue, or food particles. Hand washing with warm soapy water is always better for non-stick surfaces than a dishwasher.
-
Remove stubborn residue if needed. If there is sticky build-up that soap alone will not shift, mix a small amount of baking soda with water to form a paste. A baking soda paste applied gently with a soft sponge lifts residue without scratching the coating. Rinse thoroughly afterwards.
-
Dry the pan completely. Pat it dry with a clean cloth, then place it on the hob over low heat for one to two minutes. This removes any remaining moisture that could interfere with the oil layer.
-
Apply a very thin layer of oil. Pour a few drops of neutral oil onto the surface. Use a folded piece of paper towel to rub it evenly across the entire cooking surface, including the sides. The pan should look almost dry when you are done. Too much oil is the most common mistake here, and it results in a sticky, gummy surface rather than a smooth one.
-
Heat the pan gently. Place it back on the hob over low to medium heat for two to three minutes. This allows the oil to polymerise into a protective film, which is what gives you the improved non-stick effect. You are not trying to smoke the oil, just warm it enough to bond it to the surface.
-
Remove excess oil. Take the pan off the heat and use a fresh paper towel to wipe away any oil that has pooled or looks wet. The surface should feel smooth and barely tacky.
-
Allow the pan to cool naturally. Do not run it under cold water. Let it cool on the hob or a trivet at room temperature before storing.
Avoid heating an empty non-stick pan on high heat at any point during this process. PTFE coatings break down above 500°F (around 260°C), releasing fumes that are harmful to people and pets. Low and slow is the rule.
Pro Tip: If your pan still feels sticky after re-seasoning, you used too much oil. Wash it again with mild soap, dry it fully, and repeat the process using far less oil. The layer should be almost invisible.
How to maintain your non-stick pan after re-seasoning
Re-seasoning works best when it is part of a consistent care routine. A pan that is well looked after between uses will need far less intervention over time.
The single most important habit is using the right heat. Non-stick pans are designed for low to medium heat. Cooking on high regularly breaks down the coating faster than almost anything else, and overheating an empty pan is particularly damaging. Always add oil or butter before the pan gets hot.
Utensils matter more than most people realise. Even small scratches from metal spatulas or spoons weaken the surface and lead to flaking over time. Use wooden, silicone, or heat-resistant plastic utensils instead.
Here is a quick maintenance checklist to keep your pan performing well:
- Wash by hand with warm water and mild soap after every use
- Dry immediately and thoroughly, never leave it soaking
- Apply a tiny drop of oil after washing and drying, then wipe it off
- Store with a cloth or pan protector between stacked pans to prevent scratches
- Never put it in the dishwasher, even if the label says dishwasher-safe
- Avoid aerosol cooking sprays entirely
Watch for signs that your pan has reached the end of its life. Persistent sticking despite proper care, visible peeling, or a coating that flakes into food means it is time to replace the pan. No maintenance routine can reverse that level of wear.
Pro Tip: Cook eggs or fish regularly in your pan. These foods release natural fats that help condition the surface between re-seasoning sessions, keeping it slick with minimal effort.
Key takeaways
Re-seasoning a non-stick pan is a simple oil-conditioning process that restores cooking performance on intact surfaces, but it cannot repair a coating that is already peeling or deeply scratched.
| Point | Details |
|---|---|
| Re-seasoning is conditioning, not repair | It refreshes a sound surface but cannot fix flaking or deep scratches. |
| Use the right oil | Choose neutral, high-smoke-point oils like canola or avocado; avoid cooking sprays. |
| Apply oil sparingly | A thin, almost invisible layer polymerises correctly; excess oil turns sticky. |
| Low heat is non-negotiable | PTFE coatings degrade above 260°C, so always cook on low to medium heat. |
| Consistent care extends pan life | Hand washing, gentle utensils, and proper storage reduce how often re-seasoning is needed. |
Why I think most people overcomplicate this
People come to re-seasoning expecting a dramatic transformation, and that sets them up for disappointment. The process is genuinely simple, but the expectations around it are often borrowed from cast iron seasoning, which is a completely different thing. Cast iron builds up layers of polymerised oil over months of cooking. A PTFE non-stick pan has a factory-applied coating that you cannot replicate at home, no matter how many times you oil it.
What re-seasoning actually does is remove the gummy residue and oxidised oil that builds up with regular use, then lay down a fresh, thin film that makes the surface feel slick again. That is it. And honestly, that is enough to make a real difference if your pan is otherwise in good shape.
The mistake I see most often is using too much oil. People assume more oil means more non-stick, but it does the opposite. A thick oil layer never fully polymerises, stays tacky, and attracts more residue. The pan ends up worse than before. Wipe it almost dry before heating.
If you find yourself re-seasoning every few weeks, the pan is not the problem. The habits are. High heat, metal utensils, and dishwasher cycles are the three things that destroy non-stick surfaces faster than anything else. Fix those, and re-seasoning becomes something you do once or twice a year rather than a regular chore.
For anyone who wants a surface that genuinely improves with use rather than degrading, a natural nonstick alternative like carbon steel is worth considering. The seasoning on a carbon steel pan builds up over time and becomes more effective the more you cook with it. That is the opposite of what happens with PTFE.
— Davide
Want cookware that gets better with every use?
If you are tired of babying a non-stick pan and want something that rewards proper care rather than degrading despite it, Brass-steel makes carbon steel pans forged from a single piece of steel with no PTFE, no PFOA, and no coatings to worry about.
The Brass-steel carbon steel pans build a natural non-stick patina through cooking, and that patina strengthens over time. Their blog also covers everything from restoring a carbon steel pan to understanding cookware longevity in detail. If you want cookware that lasts decades rather than years, it is worth a look.
FAQ
Can you re-season a non-stick pan at home?
Yes. Re-seasoning a non-stick pan at home involves washing it thoroughly, drying it completely, and applying a very thin layer of neutral oil before gently heating it. This conditions the surface but does not repair a damaged or flaking coating.
What is the best oil for re-seasoning a non-stick pan?
Canola, avocado, vegetable, or coconut oil all work well. Choose an oil with a smoke point above 200°C and avoid aerosol cooking sprays, which leave residue that degrades the surface over time.
Why is my non-stick pan sticky after re-seasoning?
A sticky surface after re-seasoning means too much oil was applied. Wash the pan again with mild soap, dry it fully, and repeat the process using far less oil. The layer should look almost invisible before you heat it.
How often should you re-season a non-stick pan?
Most home cooks need to re-season every few months, depending on use. If you are re-seasoning frequently, review your habits. High heat, metal utensils, and dishwasher use all accelerate coating wear.
When should you replace a non-stick pan instead of re-seasoning it?
Replace the pan when you see peeling, flaking, or persistent sticking that does not improve with proper care. A worn or damaged coating is both ineffective and potentially unsafe.