

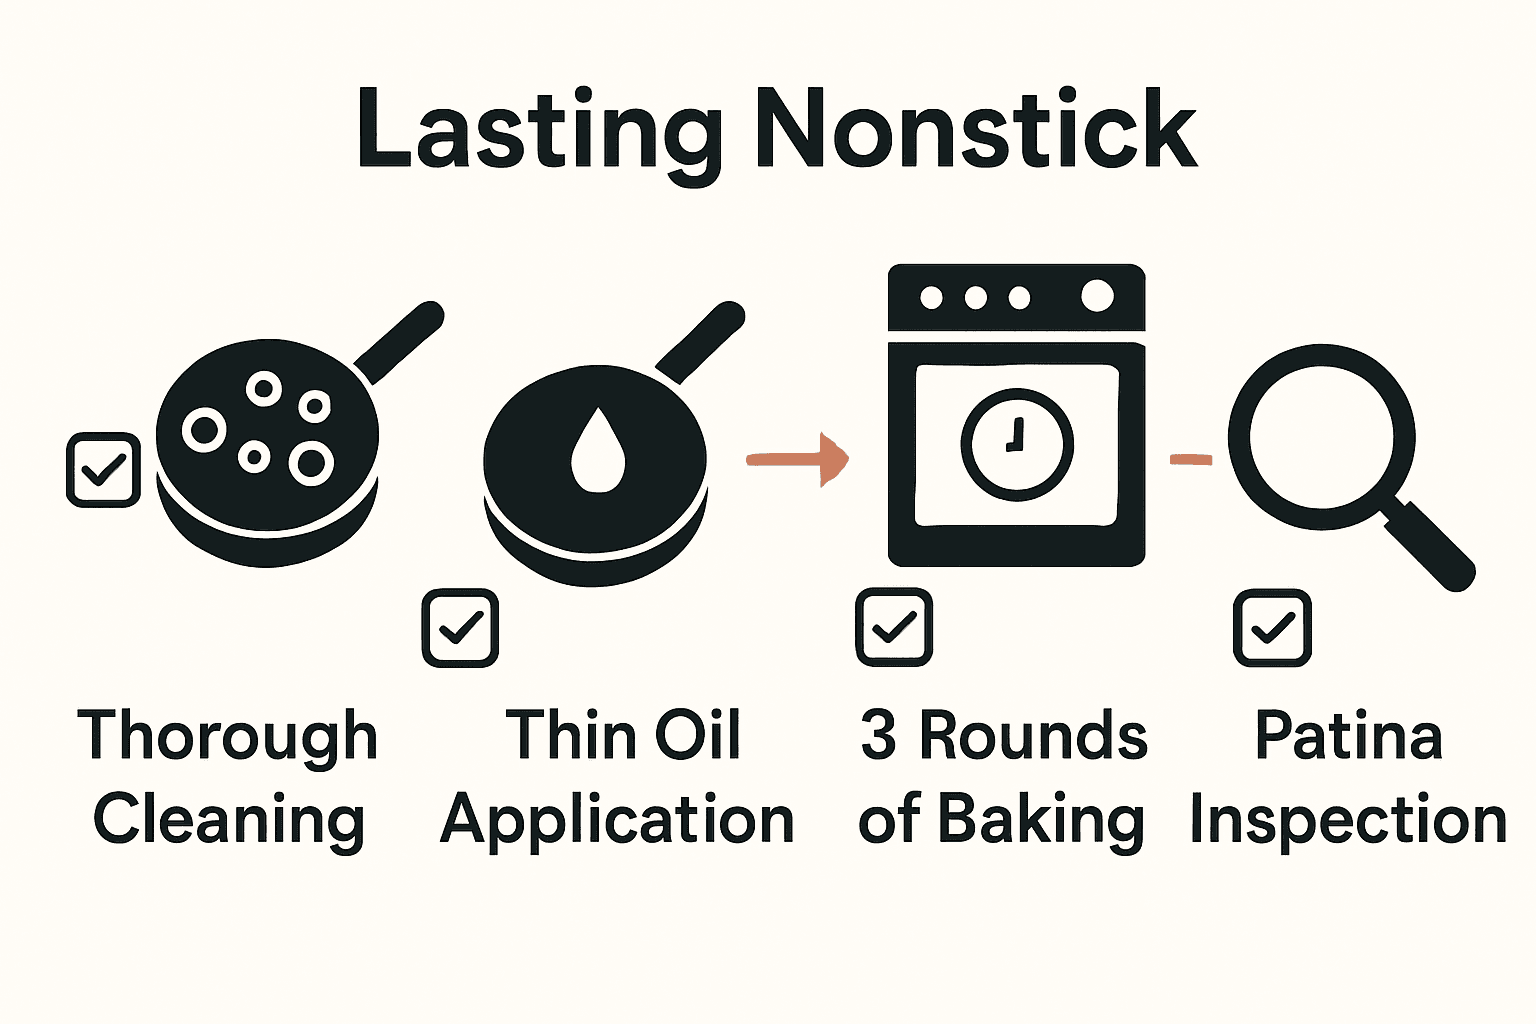
Carbon Steel Seasoning Checklist for Lasting Nonstick Performance
Over sixty percent of home cooks say their carbon steel pans stick or rust after a few uses. That struggle often comes down to improper seasoning. If you want a pan that releases foods like a dream and stands the test of time, the right start makes all the difference. Learn how a few simple steps can help you build a durable, restaurant worthy nonstick surface from day one.
Quick Summary
| Key Point | Explanation |
|---|---|
| 1. Thoroughly clean your pan | Wash with warm water and mild soap to remove manufacturing residues before seasoning. |
| 2. Apply a thin layer of oil | Use high smoke point oils and ensure the layer is almost invisible for optimal seasoning. |
| 3. Bake multiple layers for seasoning | Heat at 250°C (482°F) for 30-45 minutes, repeating the process three times to develop a nonstick surface. |
| 4. Inspect the patina for evenness | Check for a uniform dark color and conduct an egg test to evaluate seasoning effectiveness. |
Table of Contents
- Step 1: Prepare Your Carbon Steel Pan For Seasoning
- Step 2: Apply A Thin Layer Of High-Heat Oil
- Step 3: Bake And Build Up The Seasoning Layers
- Step 4: Verify Patina And Ensure Even Coverage
Step 1: Prepare Your Carbon Steel Pan for Seasoning
Preparing your carbon steel pan for seasoning is the critical first step in creating a lasting nonstick surface that will transform your cooking experience. This process removes manufacturing residues and sets the foundation for a smooth cooking surface.
According to the Ultimate Carbon Steel Pan Seasoning Guide, thoroughly cleaning your new pan is essential before seasoning. Start by washing the pan with warm water and a mild dish soap. Use a soft sponge or cloth to gently remove any protective coatings or manufacturing oils that might interfere with seasoning.
After washing, dry the pan completely using a clean kitchen towel. Pay special attention to removing all moisture possible. Any remaining water droplets can cause unwanted rust during the seasoning process. Pro tip: After towel drying, place the pan on a warm stovetop or in a low temperature oven for 2 3 minutes to ensure absolute dryness.
Once your pan is spotlessly clean and bone dry, you are ready for the seasoning stage. The goal is to create a pristine surface that will develop a natural nonstick patina through careful oil application and heat treatment.
Warning: Never use abrasive scrubbers or steel wool during initial cleaning. These can damage the pan’s surface and compromise your future seasoning efforts.
Ready to transform your carbon steel pan into a cooking powerhouse? The next step involves selecting the right oil and preparing your oven for the initial seasoning process.
Step 2: Apply a Thin Layer of High-Heat Oil
Applying the perfect layer of oil is crucial for creating an effective seasoning that will protect and enhance your carbon steel pan. This step transforms your clean pan into a naturally nonstick cooking surface.
According to the How to Season a Carbon Steel Pan Step-by-Step Guide, selecting the right oil is key. Choose high smoke point oils like grapeseed, avocado or sunflower. These oils create a durable protective layer without breaking down at high temperatures.
Grab a lint free cloth or paper towel and pour a small amount of oil onto the pan. The goal is an incredibly thin coat that covers every surface including the outside and handle. Spread the oil systematically using circular motions. Your objective is an almost invisible layer where the pan looks barely coated not dripping or pooling with oil.
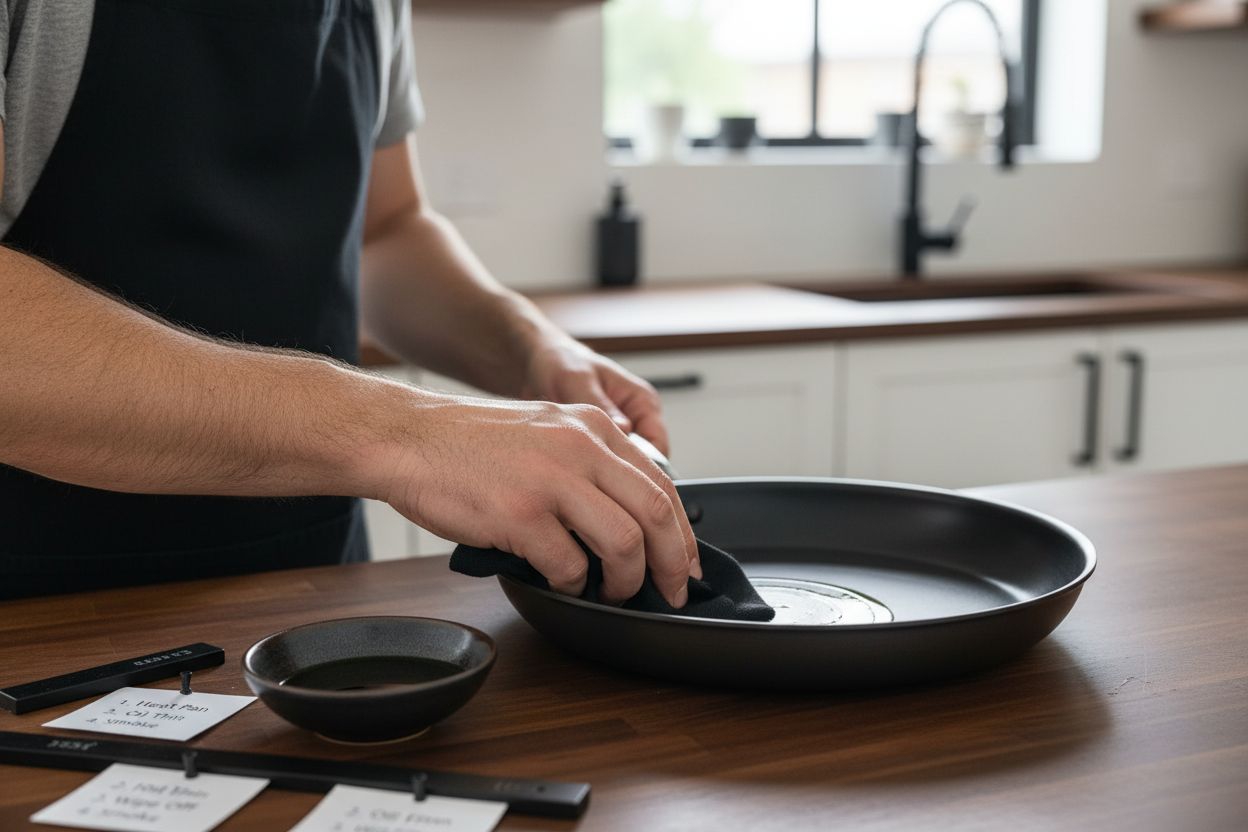
Pro Tip: Less is definitely more. If oil is visibly collecting or looks wet you have applied too much. Wipe until the surface appears nearly dry and matte.
By applying this ultra thin layer of oil you are setting the foundation for a smooth nonstick surface that will develop beautifully through repeated seasoning and cooking. Next you will transform this oiled pan into a perfectly seasoned cooking companion through careful heat treatment.
Step 3: Bake and Build Up the Seasoning Layers
Building up seasoning layers transforms your carbon steel pan from a bare metal surface into a naturally nonstick cooking powerhouse. This crucial stage creates a protective patina that will improve with every cooking session.
According to the How to Re-Season a Carbon Steel Pan for Perfect Cooking guide, the baking process is all about creating a durable protective layer. Preheat your oven to approximately 250°C (482°F). Place a large baking sheet on the bottom rack to catch any potential oil drips and protect your oven.
Position the oiled pan upside down on the middle rack. This ensures any excess oil will drip away rather than pooling and creating sticky spots. Bake for about 30 to 45 minutes. During this time the oil will polymerize creating a hard bonded layer that becomes part of the pan’s surface.
Pro Tip: Expect some smoke during this process. Open windows and turn on kitchen ventilation. This is normal and part of the seasoning chemical transformation.
After the first baking cycle let the pan cool completely in the oven. Once cooled repeat the entire oil application and baking process two more times. Each layer builds a more robust nonstick surface that will become smoother and more effective with use.
Your carbon steel pan is now ready for its first cooking adventure transforming from a raw piece of metal into a culinary tool with a beautiful protective finish.
Step 4: Verify Patina and Ensure Even Coverage
Now that you have completed the seasoning process your carbon steel pan should display a beautiful protective layer ready for culinary adventures. This final verification step ensures your pan has developed the perfect nonstick surface.
According to the Ultimate Carbon Steel Pan Seasoning Guide, a well seasoned pan will have a uniform dark brown to black color with a smooth satiny finish. Examine your pan carefully under good lighting looking for any uneven patches or areas that appear lighter or rougher than the rest.
To truly test the seasoning perform a simple egg test. Heat the pan over medium heat with a small amount of oil. Crack an egg and observe how it behaves. A perfectly seasoned pan will release the egg effortlessly with minimal sticking. If the egg clings or tears you might need to repeat the seasoning process.
Pro Tip: Dont be discouraged if your first attempt isnt perfect. Carbon steel pans develop their best nonstick properties through repeated use and seasoning cycles.
The darkening of your pan is a positive sign. Each cooking session will continue to improve the patina making your pan more nonstick and more resilient. Think of this as breaking in a new pair of leather boots the more you use it the better it becomes.
Your carbon steel pan is now ready to become a trusted companion in your kitchen transforming from a raw piece of metal into a beautifully seasoned cooking tool.
Here’s a summary of the key steps for seasoning your carbon steel pan:
| Step | Key Action | Purpose |
|---|---|---|
| Prepare Pan | Wash, dry thoroughly | Remove residues, prevent rust |
| Apply Oil | Thin, even layer of high-heat oil | Create base for patina |
| Bake Layers | Heat at 250°C, repeat 3 times | Build durable nonstick surface |
| Verify Patina | Inspect, perform egg test | Ensure even, effective seasoning |
Transform Your Cooking With Seasoned Carbon Steel Precision
You have invested time and care into perfecting your pan’s nonstick surface by following the step-by-step carbon steel seasoning checklist. But even the best technique can fall short if your cookware is not up to the task. Flaky nonstick performance, stubborn sticking, and uneven results are all too common with ordinary pans that lack single-piece construction and precise heat control. If you are seeking durable, natural nonstick performance and an easy seasoning process every time, discover our Carbon Steel Collection crafted especially for passionate home cooks and professionals alike.
Do not let hard work go unrewarded. Upgrade your kitchen arsenal with a pan designed for flawless seasoning, professional heat retention, and effortless maintenance. For more tips or to explore our cookware range, visit Brass & Steel today. Ready to start your culinary journey? Shop heirloom-quality carbon steel pans engineered for the results you deserve.
Frequently Asked Questions
How do I prepare my carbon steel pan for seasoning?
To prepare your carbon steel pan, wash it with warm water and a mild dish soap to remove any protective coatings or manufacturing oils. Be sure to dry it thoroughly, even placing it on a warm stovetop for 2-3 minutes to ensure there’s no moisture left.
What type of oil should I use for seasoning my carbon steel pan?
Use a high-heat oil with a smoke point above 400°F, such as grapeseed, avocado, or sunflower oil. Pour a small amount onto the pan and spread it in thin, even layers to avoid pooling or excess oil.
How long should I bake my carbon steel pan during the seasoning process?
Bake your oiled carbon steel pan at 250°C (482°F) for 30 to 45 minutes. Repeat this process three times to build strong, effective seasoning layers that enhance nonstick performance.
What should I look for to verify the seasoning of my carbon steel pan?
Check if your pan displays a uniform dark brown to black color with a smooth satiny finish. Perform the egg test by cooking an egg in the pan—if it releases easily, your seasoning is successful!
How do I maintain the seasoning on my carbon steel pan after initial seasoning?
To maintain your pan’s seasoning, always clean it with warm water and avoid abrasive scrubbers. Regularly cook with oil and re-season as necessary, especially if you notice any sticking or uneven spots developing.
Can I re-season my carbon steel pan if the seasoning wears off?
Yes, you can re-season your carbon steel pan if you notice a decline in its nonstick properties. Simply follow the initial seasoning steps again—washing, drying, applying a thin layer of oil, and baking the pan for several cycles.
Recommended
- Ultimate Carbon Steel Pan Seasoning Guide for Perfect Results – Brass & Steel
- How to Re-Season a Carbon Steel Pan for Perfect Cooking – Brass & Steel
- Master the Art of How to Store Carbon Steel Pans – Brass & Steel
- Cooking with Carbon Steel Step by Step: Mastering Techniques – Brass & Steel
- Seasonal Baby Food Recipes: Your Year-Round Prep Guide | Parent Kitchen Lab